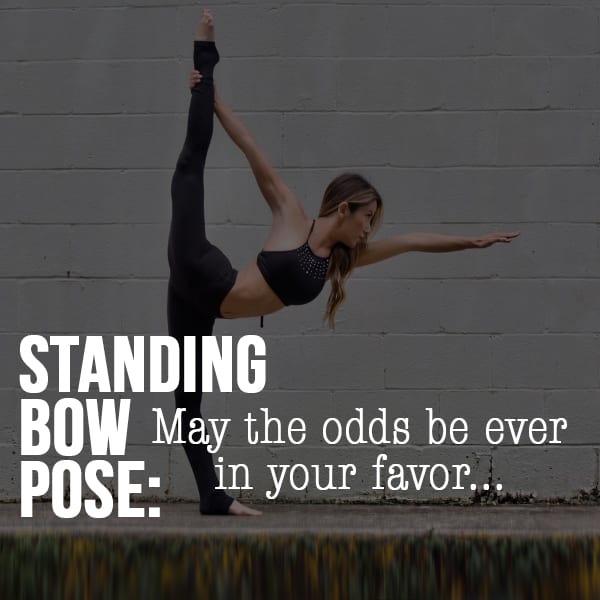
Standing Bow Pose: How to up your (Hunger) game! May this posture be ever in your favor….

You’ve seen it. It’s the quintessential yoga pose. On every mountaintop, beach, and natural wonder of the world, someone has now done a #stopdropyoga and you can bet your bottom dollar that this is one of the most popular choices in the modern yogi’s repertoire. And who can blame them? From beginner yogi to decorated veteran yogi, nobody can deny the beauty and grace exuded in a posture that creates the shape of a bow and arrow -equal parts strength and grace. But how useful is a bow and arrow that isn’t aimed straight or even one that isn’t pulled tight? Don’t know what i’m talking about then ask Katniss Everdeen (from the blockbuster movie The Hunger Games). It wasn’t her beauty or grace that helped her survive the Hunger Games, but rather her bulldog determination to precision, accuracy, and focus, that gave her the upper hand in the biggest fight for her life. Now that sounds pretty dramatic, but this posture was meant to exemplify the intense focus of this primitive sport. And, and as beautiful as this posture may be, if you practice humility and honesty in your daily practice this posture tends to serve up a large helping of “humble pie”. If you go beyond the impressive shape of this posture, it not only takes dedication to alignment but also learning which intricate muscles to relax and which to contract to hit the bullseye of the mental and physical benefits.
The secrets to this posture are found in this precision based sport, so let’s go there for our cues. I will explain this posture on the right side for sanity’s sake so that I can explain using “right” and “left” cues, but this posture can obviously be done on both sides.
- Stance and set up: Stand up straight. Keeping the right elbow touching your waist and bend your arm 90 degrees keeping your palm facing up. Keeping the knees together begin to bend your right knee drawing your heel toward your Gluteus muscle. Still keeping the knees together, reach and grab for the right ankle at the inside of the ankle (right where the knobby bone of the ankle protrudes). Extend the left hand up drawing the left Bicep by the left ear. Left palm should be facing forward. Begin to inhale, and you reach your left hand higher as if you are going to touch the ceiling, shoulder coming out of the body. The whole body should feel extended and pulled tight.
- Grip: Keep all 5 fingers of the right hand together (including the thumb). Grip should be strong but no break in the wrist. Although the grip is tight (white knuckled), make sure that as you begin to kick back that you do not begin to pull with the strength of the right arm, the bow is drawn with the kick.
- Place the arrow on the bow: In this posture, the arrow is formed with the two arms. The bow is formed with the kicking leg. Thus, it is important that the force comes with the kick (kicking is hard and continuous). As you begin to kick back and away from the body, you form the bow and you are also placing the arrow on the bow simultaneously. As you begin to kick back, the arms begin to be pulled into one line, from the left fingertips all the way to the right hand grip. You are working on getting the arms in one line so the shoulders will also be pulled in to one line through the force of the kick. Eventually, the chin will be touching the left shoulder because you have never changed the position of the head but because the shoulders are pulled in one line (from the reaching and kicking actions), then the left shoulder will keep moving to align with the chin (the midline of the body) -not the other way around. In other words, you are reaching so much with the left fingertips that the left shoulder eventually meets the chin, not the chin reaching for the shoulder.
- Finger position: Just as all 5 fingers of the right hand are together and touching, same goes for the fingers of the left hand. They are together and the palm is facing forward and rotates down as the body comes down. Also, when looking in the mirror in front of you, the fingertips of the left hand should appear as if they are touching the iris of the left eye; the hand position is much higher than many realize. This helps you keep as arch in the spine and initiates the backbend.
- Draw: As I mentioned earlier, the kick is continuous. You need to draw a bow tight in order to shoot an arrow, right? Imagine what would happen if you released the tension in a bow and arrow and then tried to shoot an arrow… the arrow would flop to the ground no matter how good you may be. Same goes for this posture. Keep kicking! Only when you feel that your kick is maximized and you can’t kick any harder, do you even think about rotating the body at all. I often see people begin to let the belly rotate down when there is still some slack in the bow and this is a recipe for misalignment and a wobbly bow and arrow.
- Aim: In this posture, everything will eventually line up in one straight line in the front mirror. Look at the picture (below). You will see two feet in one line. Not only that, but you will also, see my chin, left fingertips, gaze, everything in one line as if I am standing between two panes of glass. The only thing that should not be in one line from the front are the hips. The hips should be square to the ground, so there also needs to be a continuous effort to pull the right hip down. This creates a twist in the spine. See how everything is in one line in the picture, below? Except, my hips look like the are next to each other on either side of my body? That is the correct alignment. I often see people opening their right hip to achieve an kick that appears higher, but are really just trading alignment for pseudo-depth. As you rotate your body down, you should rotate as if you are on an axis and there should be no side to side motion. Keep coming down until the belly button is facing the ground (while never letting up on the kick). Hold steady, breathe normally, and keep your eyes focused on your left fingertips touching your left eye in the mirror.
- Release: When you are ready to come out, use your inhale to lift yourself back up the same axis from which you rotated down -reversing out the exact same way you came down. Never let your left fingertips come away from touching your left eye win the front mirror. End in the same position you began your set up.

So, go ahead now. Channel your inner Katness, and may this pose be ever in your favor!
Namaste, Bendy Babes,
Xoxo,
Paloma

Paloma is an avid yoga enthusiast, practitioner, and teacher in Louisville, Kentucky. She created Her Bendy Life as a way to expand on her passion for all things yoga. She has found that yoga is a very personal journey and she wanted a create a space to share some of the experiences, tips, and tricks from her dedication to her ever evolving practice. She received a 200-RYT certified from Cindy Lunsford in Hot Vinyasa Yoga and also traveled to Cabo San Lucas to train with Tony Sanchez in the Ghosh Lineage. Paloma took her practice to new heights in 2016 when she placed 1st in the Yoga Federation’s Regional Competition in Chicago Illinois and 9th in the 2016 National Yoga Championship.
Paloma’s teaching emphasizes using the planes of the body to achieve proper alignment, allowing students to achieve the full therapeutic benefits of yoga. She believes in adapting postures to each students ability (whether beginner or advanced) while maintaining physical alignment. Paloma believes that yoga should never be dogmatic and that students should only go as far into a posture as what is comfortable for them. She helps students find modifications that help them safely progress. Paloma lives with her husband George, her Labrador Retriever Belle, and her Pug Piper.
Instagram: @her_bendy_life


